Surface to Surface Contact Abaqus | Errors Fixed, Setup Explained
Which one should you use: surface to surface contact or general contact in Abaqus? Abaqus Surface to surface contact allows detailed control over the interaction between two surfaces, specifying contact pairs and behavior precisely. General contact, on the other hand, simplifies the setup by automatically detecting and managing various contact types across the entire model (Surface interaction Abaqus).
Abaqus Surface to surface contact can be more complex due to the need to manually define each contact pair and their properties, which can be time-consuming and prone to errors. It provides detailed control, making it suitable for scenarios where precise contact behavior is essential. General contact, however, automatically handles contact between all surfaces, making it ideal for complex models with many contact interactions and where setup efficiency is crucial.
In this blog, we will explore the differences between surface to surface contact and general contact in Abaqus. We’ll discuss how to adjust surface contact, the roles of master (Main) and slave (secondary) surfaces, and the advantages and features of general contact. By the end, you will have a clear understanding of when to use each contact type based on your model’s requirements and the specifics of your analysis.
6 hours of professional, in-depth, yet beginner-friendly tutorials, with hands-on workshops to help you apply what you learn. The Abaqus for beginners package is all you need to start mastering Abaqus and become a skilled FEA analyst.
 |
|
1. What is surface to surface contact Abaqus?
In Abaqus, the term “surface to surface contact” refers to a type of interaction between two surfaces. Faces belonging to different bodies or parts in a finite element analysis (FEA) model. It enables the simulation of contact and interaction between these surfaces taking into account factors such as friction, sliding, separation or penetration.
Abaqus surface to surface contact is commonly utilized when there is no need to precisely model the contact behavior at a node or point level. Instead, it focuses on considering the interaction between surface areas. This approach is appropriate, for scenarios where the overall behavior of the surfaces interaction takes precedence over localized interactions.
When defining surface-to-surface contact in Abaqus, you typically specify the contact pairs or surfaces involved, the contact behavior (such as friction, separation, or tie constraints), and the contact properties (such as contact stiffness, friction coefficients, and contact parameters). Abaqus then determines the contact forces and interactions between the surfaces during the analysis based on the defined contact behavior and properties.
Abaqus Surface to surface contact allows for the simulation of various real-world scenarios, such as metal-to-metal contact, contact between different materials, contact between deformable bodies, and sliding or separation between surfaces. It enables the accurate representation of contact phenomena and is widely used in structural, mechanical, and multiphysics simulations to analyze the behavior of complex assemblies or systems where contact interactions play a significant role. Surface-to-surface contact can be specified in any step of the analysis, even in the initial step. To define it, go to the main menu bar, click on “Interaction,” then select “Create.” From there, choose the master and slave surfaces involved in the contact interaction.
2. How to adjust Abaqus surface contact? | Surface Interaction Abaqus adjustment
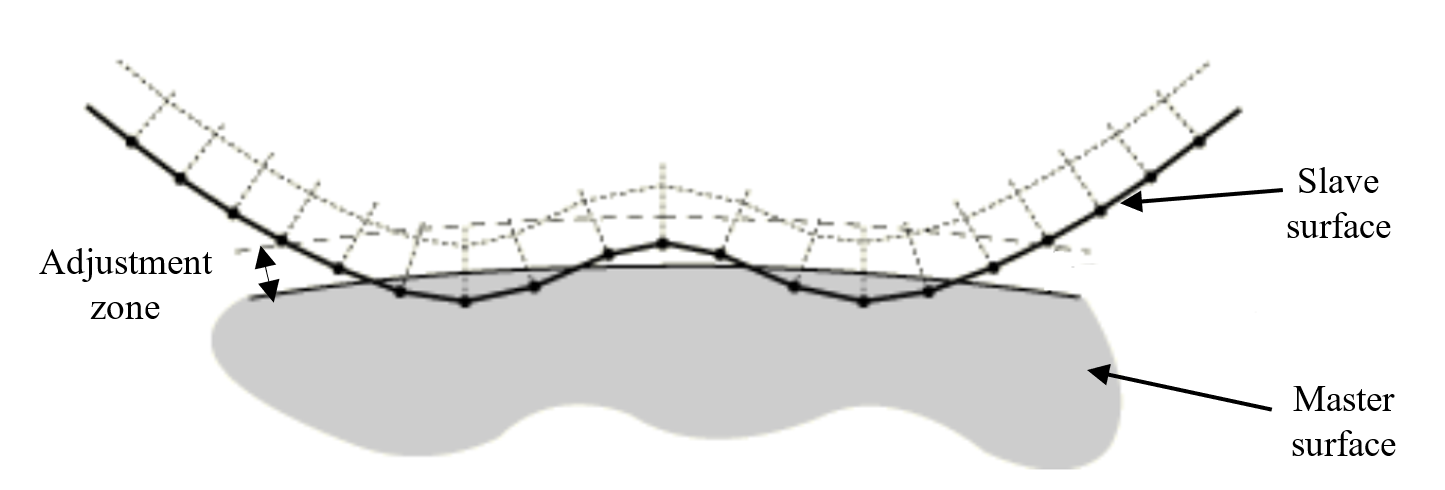
If some nodes of the slave (secondary) surface are penetrated the master (main) surface in the initial stages and cause some convergence problems, how can we solve this issue?
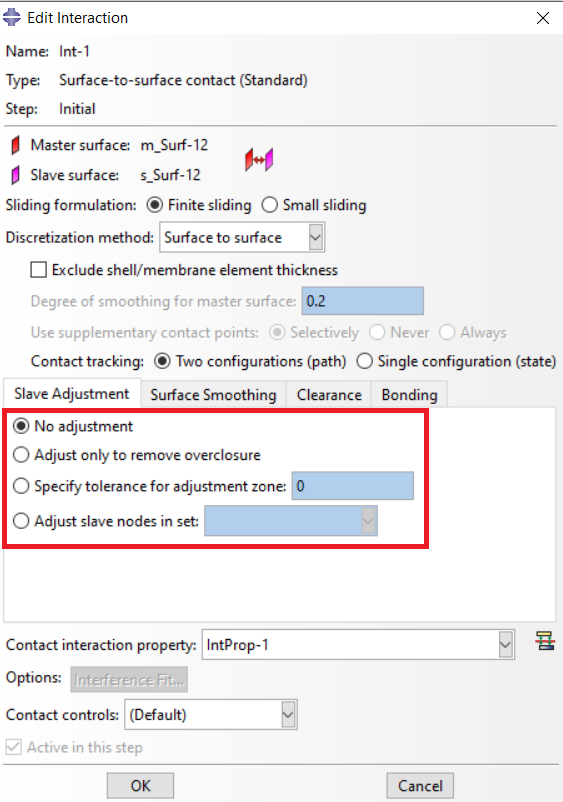
If you are faced with this issue at the beginning of the process in the surface interaction Abaqus, as illustrated in figure 1, you can solve this issue through three options in the “Edit Interaction” window (see Figure 2).
Figure 1: penetration of some slave (secondary) nodes into the master (main) surface
Figure 2: slave adjustment options
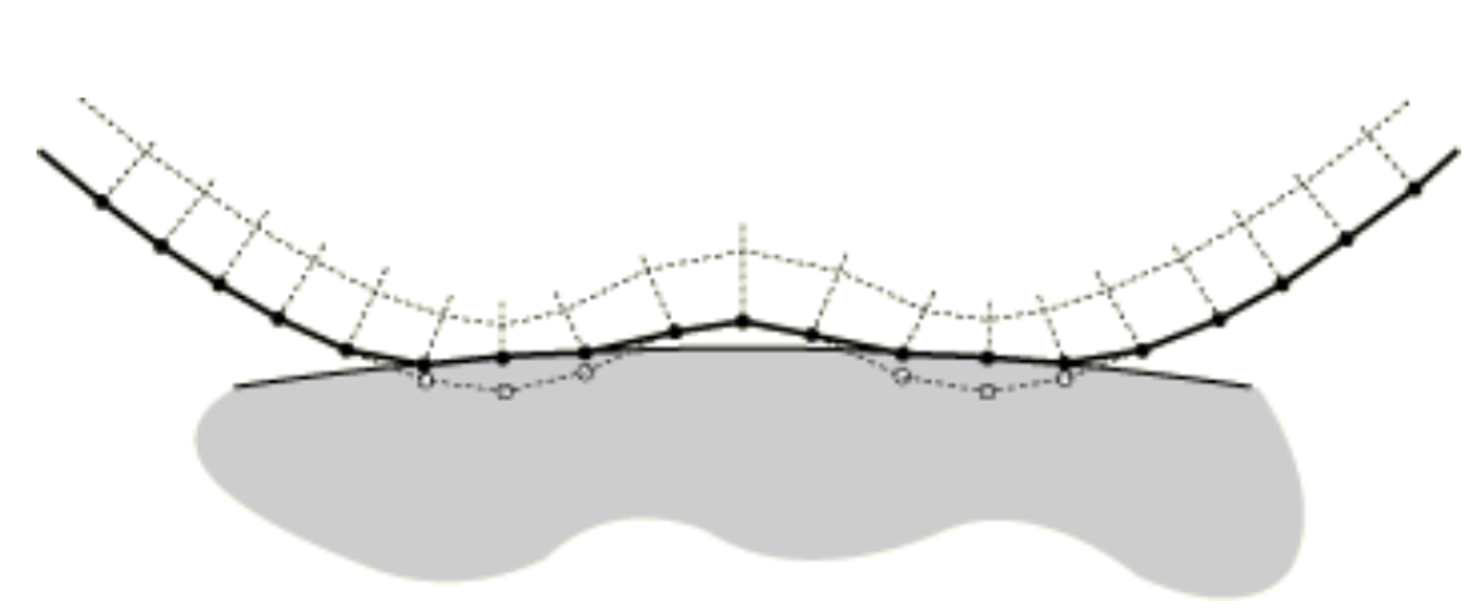
Now, if you use the “Adjust only to remove overclosure” or select the “Specify tolerance for adjustment zone” and specify the zero value, the software will only adjust the nodes that penetrated the master (main) surface (see Figure 3).
Figure 3: adjusted nodes
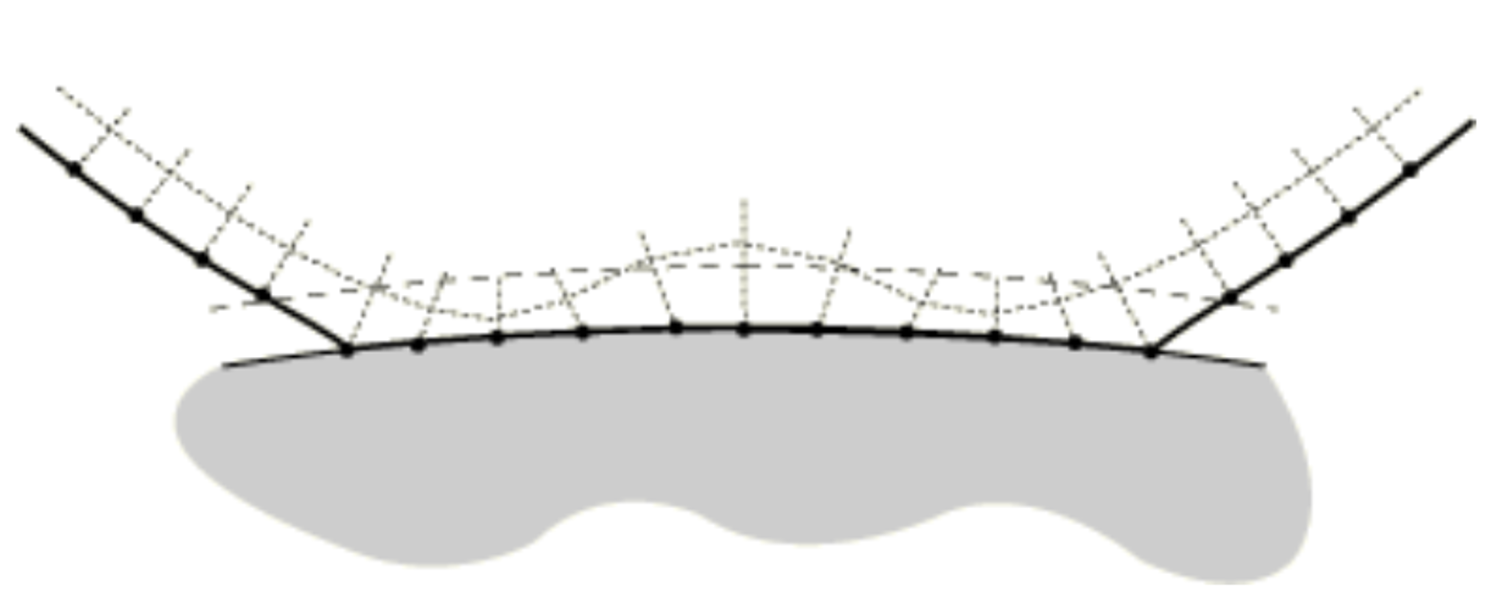
If you specify any other value than zero in the adjustment zone, for example, see figure 1, the software will move any nodes within the adjustment zone precisely onto the master (main) surface (see figure 4).
Figure 4: nodes moved on to the master (main) surface
By selecting the “Adjust slave nodes in set”, you would be able to create a node set of those nodes of slave (secondary) surface that may cause convergence issues, and the software will only check them and take action. If the node set contains nodes not belonging to the slave (secondary) surface, the software will ignore them.
To ensure proper conformity between the master (main) and slave (secondary) surfaces in Abaqus, it is recommended to follow the guidelines provided in the Abaqus Manual:
- Increase the element density of the slave surface compared to the master surface.
- Assign the slave surface to the smaller of the two surfaces.
- Assign the master surface to the stiffer body, considering both geometry and material properties.
If it is not feasible to satisfy all three criteria, priority should be given to the first two guidelines for achieving optimal conformity.
3. Master/Slave (Main/Secondary) surfaces basic rules
In Abaqus surface to surface contacts, which one should be master?
When defining surface to surface contact in Abaqus (surface interaction Abaqus), you need to specify the master and slave surfaces for each contact pair. The contact forces and interactions are then determined based on the defined contact behavior, properties, and the relative motion between the master and slave surfaces.
In a surface to surface contact Abaqus analysis, the contact forces are calculated based on the interaction between the nodes or elements on the slave (secondary) surface and the corresponding nodes or elements on the master (main) surface. The master surface is responsible for driving the contact behavior and influencing the interaction between the surfaces.
3.1. What is the master surface? | main surface
In Abaqus, the term “master surface” refers to one of the two surfaces involved in a contact interaction. In newer versions of Abaqus the master surface is called “Main surface”. When modeling contact between two bodies or parts, the master surface is the surface that controls the contact behavior and generates the contact forces.
The selection of the master surface is important as it determines how the contact forces will be computed and applied during the analysis. The master surface is typically the surface that remains stationary or undergoes less deformation compared to the other surface, which is known as the “slave surface.”
Most errors in Abaqus simulations happen because analysts lack in-depth knowledge of the software and make simple mistakes, like not using a consistent unit system, which leads to errors. What they need is thorough training in Abaqus concepts and tools to run accurate and precise simulations—and that’s exactly what our Abaqus for Beginners package offers.
3.2. What is a slave surface? | secondary surface
In Abaqus, the term “slave (secondary) surface” refers to one of the two surfaces involved in a contact interaction. When modeling contact between two bodies or parts, the slave surface is the surface that adapts its behavior based on the contact forces imposed by the master surface.
The slave surface is typically the surface that undergoes relative motion or deformation in response to the contact forces generated by the master surface. It adjusts its position and shape to conform to the contacting surface of the master surface.
3.3. Master slave contact
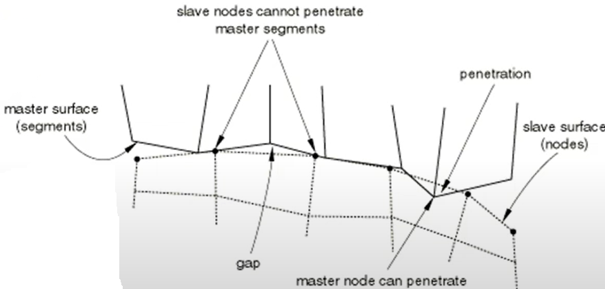
Generally, if a larger surface contacts a smaller surface, it would be better to have the larger one as master surface; however, if both surfaces have the same size, the one with the stiffer body (usually the rigid surface) should be the master. Note that the slave surface should have meshed more finely than the master. The master will have coarser Abaqus mesh. Also, the master surface nodes can penetrate the slave surface but not the opposite (see Figure below).
Figure 5: Position of the master and slave surfaces nodes
3.4. Critical Penetration Parameter | HCRIT
HCRIT is a critical penetration parameter used in Abaqus/Standard to control the behavior of the numerical solver when dealing with contact interactions. It represents the threshold penetration distance between the secondary surface and the main surface in a contact pair. If the penetration between the surfaces exceeds the specified HCRIT value during an iteration, Abaqus/Standard abandons the current increment and reduces the step size to improve convergence.
By default, HCRIT is set to half the length of a characteristic element face on the secondary surface, or in some cases, the radius of a sphere circumscribing a characteristic surface element face. It only applies to specific contact formulations like small-sliding and finite-sliding node-to-surface interactions.
The primary purpose of HCRIT is to ensure the accuracy and stability of simulations involving contact by preventing excessive penetration (overclosure) between the interacting surfaces. In complex finite element analysis (FEA) models where contact plays a crucial role—such as simulations of mechanical assemblies, crash analyses, or biomedical applications like bone-implant interactions—accurate representation of surface interaction is key to producing realistic results.
However, HCRIT does not apply to finite-sliding surface-to-surface contact formulations, which handle contact differently and do not rely on a specific critical penetration distance.
3.5. How to use HCRIT in Abaqus?
To use and access the HCRIT parameter in Abaqus, you must modify your input file, as Abaqus/CAE (the graphical interface) does not allow direct modification of this parameter. Here’s how you can effectively work with HCRIT in Abaqus:
To define or adjust the HCRIT value, you will need to modify the input file (.inp) for your analysis. This is done by using the “CONTACT PAIR” keyword in the input file. Abaqus will allow you to specify a custom HCRIT value for individual contact pairs if the default value is unsuitable.
Example of Using HCRIT in the Input File:
| *CONTACT PAIR, HCRIT=value Secondary_surface_name, Main_surface_name |
- “value”: The critical penetration distance (HCRIT) that you want to define for the specific contact pair. This value should be adjusted based on the nature of your model, typically smaller for models with fine meshes or highly curved surfaces.
- “Secondary_surface_name”: The name of the secondary surface in the contact pair.
- “Main_surface_name”: The name of the main surface in the contact pair.
For instance, if you have a contact pair with significant curvature and want to reduce the penetration tolerance, you could assign a specific value to HCRIT:
| *CONTACT PAIR, HCRIT=0.001 Surface_1, Surface_2 |
In this case, the HCRIT value of 0.001 (in appropriate units) specifies the critical penetration distance before the solver abandons the increment and refines the step.
3.6. When and How to Adjust HCRIT?
-
Default Values: In many cases, the default HCRIT value provided by Abaqus (half the length of the characteristic element face or the radius of a sphere that circumscribes the characteristic surface element) is sufficient. However, if you encounter issues like excessive penetration or convergence problems, you may need to adjust this value.
- Models with Complex Geometry: For models involving highly curved surfaces or where penetration can cause significant numerical errors, it is advisable to reduce HCRIT.
-
Refined Meshes: When working with very fine meshes, especially for secondary surfaces, the default value of HCRIT may be too conservative. In such cases, you may consider increasing the HCRIT value if overclosures larger than the default can be handled by the solver.
4. Abaqus General Contact VS Surface to Surface contact
Now, let’s see the Abaqus general contact VS surface to surface contact
General Contact:
- Automatic Handling: Automatically manages contact between all surfaces in the model, reducing manual setup.
- Versatility: Handles multiple contact types, including surface-to-surface, edge-to-surface, and edge-to-edge.
- Ease of Use: Simplifies the setup process with an all-inclusive contact domain.
Surface-to-Surface Contact:
- Manual Specification: Requires manual definition of master and slave surfaces for each contact pair, which can be more time-consuming and prone to errors.
- Precision: Provides more control over the contact interactions, which can be beneficial for specific scenarios requiring detailed contact definitions.
- Accuracy: Generally offers more accurate stress and pressure results compared to node-to-surface contact.
Read More: One of the common errors in Abaqus is “Abaqus Zero Pivot Error“.
5. Which one should I use? The General contact or Surface to Surface contact
The choice between general contact and surface-to-surface contact in Abaqus depends on the specific requirements of your model and analysis:
Use General Contact When:
- The model has complex contact interactions with many surfaces.
- Comprehensive contact detection is required without extensive manual setup.
- Time efficiency and simplicity in defining contact are priorities.
- The contact behavior is not highly specific to individual pairs.
Use Surface-to-Surface Contact When:
- Precise control over contact properties for specific interactions is needed.
- The model has relatively few contact pairs, making manual definition feasible.
- Specific contact behaviors need to be fine-tuned for certain pairs.
- The user has a clear understanding of the contact interactions and can define them accurately.
Bottom line, general contact is ideal for large, complex models where automatic detection simplifies the setup process, while surface-to-surface contact is better suited for cases requiring detailed and precise control over individual contact interactions (Abaqus general contact VS surface to surface).
Now, before we go any further, when it’s come to contact in Abaqus, you might have heard of Hard contact or Abaqus normal behavior. Good news is we have all your answers in this article: What is Hard Contact Abaqus? | Defining Abaqus Normal Behavior
6. What is Abaqus General Contact?
A powerful and versatile approach that automatically detects and manages various contact types (surface-to-surface, edge-to-surface, etc.) throughout the analysis. It simplifies model setup by eliminating the need to define every possible contact pair beforehand.
6.1. Advantages and Features
- Automatic Detection: Automatically detects and defines contact pairs between all specified regions in the model, which simplifies the setup for complex interactions.
- Ease of Use: Reduces the need for extensive manual contact pair definitions, saving time and reducing potential errors.
- Comprehensive Coverage: Suitable for models with complex contact interactions where manual definition would be cumbersome.
- Global Application: Can be applied globally to the entire model, ensuring no contact interactions are missed.
- Robust Algorithms: Uses robust algorithms to handle various contact scenarios, including self-contact and large deformation scenarios.
- Efficiency: Enhances computational efficiency by leveraging automatic contact detection mechanisms.
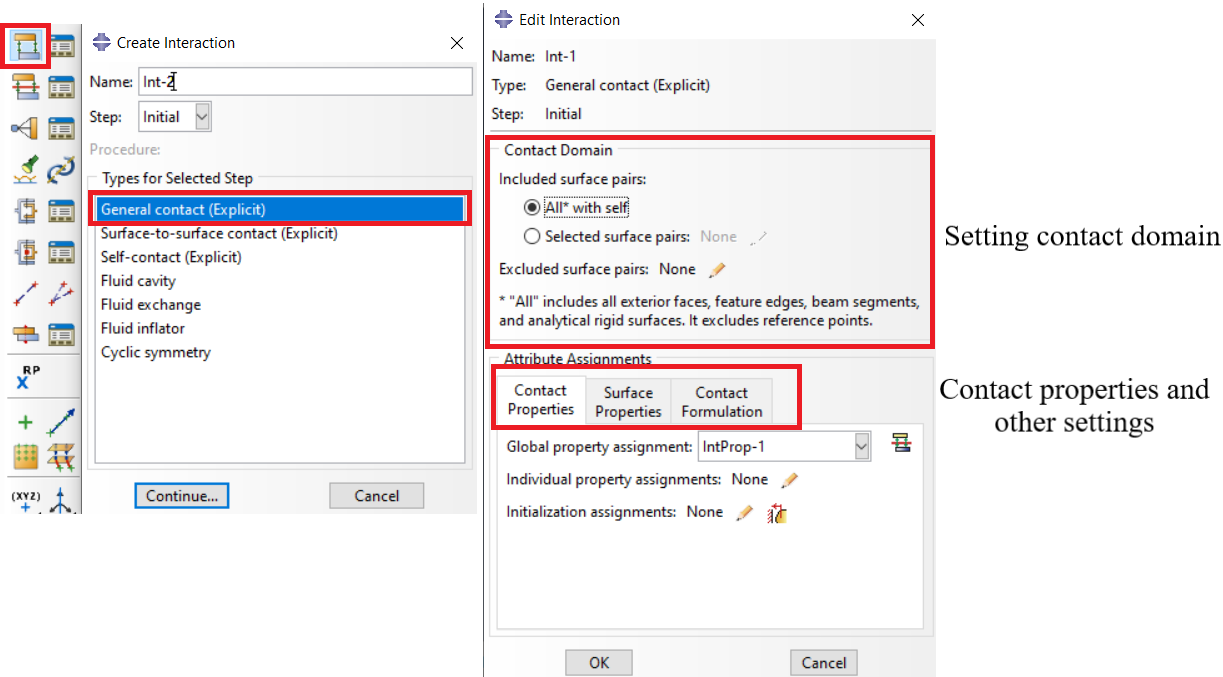
6.2. How to Apply General Contact in Abaqus
- Create the Model: Create the parts, assembly, and mesh your model as usual.
- Define Contact:
- Go to the Interaction module.
- Select Create Interaction.
- Choose General Contact from the list of interaction types.
- Specify Contact Domain:
- In the General Contact dialog, specify the domain of the contact (e.g., all exterior faces, specific regions).
- Adjust settings for contact properties, such as friction, normal behavior, and tangential behavior.
Figure 6: Defining General contact
Note: There are differences between General contact in Abaqus Standard and General contact in Abaqus Explicit.
7. Conclusion
Great news: You can learn more about Abaqus contacts and know the details about other modules of Abaqus or your still learning the Abaqus, we recommend to sign up to our Abaqus course.
Explore our comprehensive Abaqus tutorial page, featuring free PDF guides and detailed videos for all skill levels. Discover both free and premium packages, along with essential information to master Abaqus efficiently. Start your journey with our Abaqus tutorial now!
Stress singularity
When I defined the interaction between a rivet and a hole in Abaqus (the contact between them was previously defined as tie contact), I ran into a stress-singularity problem, and as the element number increased, the maximum von Mises stress increased as well. This puzzles me after multiple attempts, including filleting the hole edges. Furthermore, the model did not converge when I changed the tie contact to the penalty contact. Is there any way to resolve the problem?
You could use the Explicit solver to avoid convergence issues. If you want to know more about Standard and Explicit solvers, refer to this link:
Differences between ABAQUS Standard & ABAQUS Explicit
If you need to fix these two parts (hole and rivet), use the tie constraint; otherwise, choose any other interaction that depends on your model, like surface-to-surface contact.

