
How to obtain Abaqus reaction force?
This blog is right for any Abaqus user looking for a comprehensive guide on Abaqus Reaction Force (Abaqus RF). You can easily obtain reaction forces in Abaqus using XY Data. This can be done for a specific node or area, or you can even obtain the total reaction forces in Abaqus. Here at CAE Assistant, we aim to provide accurate answers to your Abaqus questions. Let’s go.
Abaqus RF – Introduction
Before we proceed to the reaction force in Abaqus, let’s take a look at its meaning.
Newton’s third law of motion says that all forces occur in pairs, so if one object exerts a force on another, the second object will respond with an equal and opposite reaction force. The general statement of Newton’s third law of motion is: “For every action, there is an equal and opposite reaction.” There are different reaction forces in Abaqus, such as Contact Forces, Gravitational Forces, Tension Forces, Air Resistance Forces, Electrical Forces, Magnetic Forces, etc.
There are two types of contact forces as a result of action and reaction forces between objects that have contact together. One of the contact forces is the Normal force. This force is the force that surfaces exert on each other to prevent them from passing through each other. The frictional force is another reaction force that acts parallel to the surface to prevent sliding against each other. To calculate these contact forces, you should define normal and frictional properties in the interaction module. In a finite element simulation user may need to find the effect of each reaction forces in the result.
Read More: Abaqus viewer / Abaqus results / Abaqus visualization
Generally, we have three choices to find the total Abaqus Reaction force (Abaqus RF) acting on the body:
1.Using XY Data in post-processing to find Abaqus RF
Another method of finding out the Total Reaction Force without going into the model setup stage would be to obtain the reaction forces at all the nodes on the body and then sum up the forces(Abaqus sum reaction forces). In this lecture, we discuss the second method, which is simpler and more useful when your analysis has been completed, and you already have results and do not tend to submit a new job.
2. Using History Outputs to Extract the Abaqus Reaction Force
Another method to extract the reaction force in Abaqus is to define history outputs in the model. Abaqus will then automatically extract the reaction force for the desired region.
3. Defining a reference point and using kinematic coupling
The body can be coupled to a point during the model setup stage. After the analysis, the Abaqus RF can be checked at this node, which gives you the total reaction force in Abaqus.
 |
⭐⭐⭐Free Abaqus Course | ⏰10 hours Video 👩🎓+1000 Students ♾️ Lifetime Access
✅ Module by Module Training ✅ Standard/Explicit Analyses Tutorial ✅ Subroutines (UMAT) Training … ✅ Python Scripting Lesson & Examples |
1. Using XY data to find reaction force in Abaqus
- In Visualization module, Click on the “Create XY Data” icon.

- In the dialogue box which appears, toggle ODB field output:

- Click on Continue…
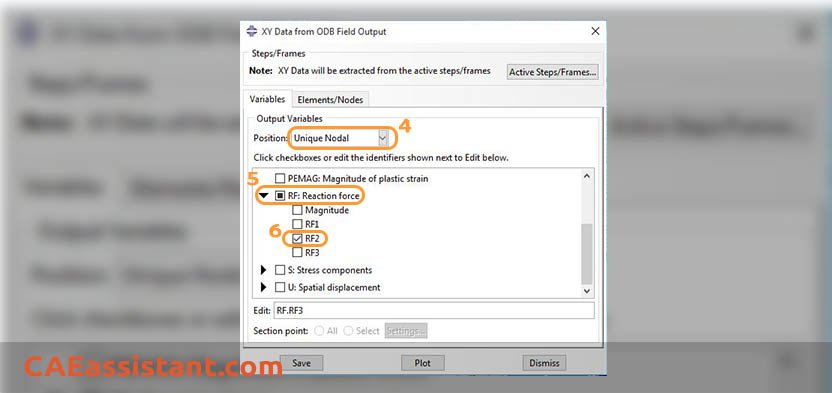
- In the XY Data from ODB Field Output Dialog box, choose
Position: Unique Nodal

- Then, scroll and click on the right-pointing triangle next to RF to open up.
- Select the component you are interested in say RF2 (This means that you have requested Abaqus RF in the second direction.)
RF: RF2 will appear in the window below
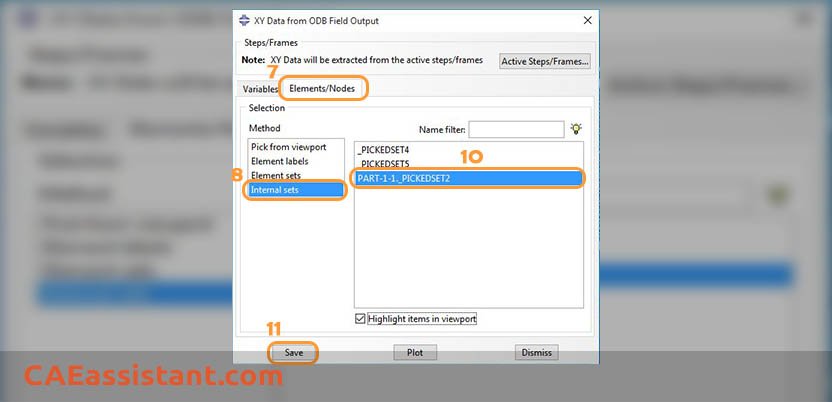
- Click on the TAB: Element/Nodes
- On the left, click on “Internal Sets”
- On the right, the node sets automatically created by Abaqus will appear. For any part, Abaqus create a set, which has a name like “PART-1-1._PICKEDSET2”.
- Select the part (automatically defined node-set) for the reactions you require.

- Click on SAVE
- In the Save XY Data dialog box, click on OK.
- Click on “Create XY DATA” icon (the same one as before)
- This time TOGGLE “Operate on XY DATA”:

- Click on CONTINUE…
- In the new dialog box on the right, will be listed various functions/operations.
Scroll down and click on Sum((A, A….)). by clicking on the SUM operation you will be able to get Abaqus sum reaction forces. This can be calculated for all nodes or specific nodes. - On the left, all the reaction forces (RF3, say) for each of the nodes in the selected set will be listed…


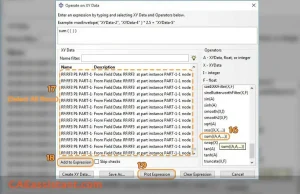
Highlight all of these rows to get the total Abaqus RF.
Please note that if you do not require the total reaction force, you have the option to select a reaction force for a specific node or nodes.
(Method 1: by holding down the left mouse button and dragging it over all the lines. Method 2: Easily select the first line, hold down the SHIFT key, scroll down to the last line, and click on it).
19. Click on the Add to Expression button
20. Click on the Plot Expression button.
This will plot the sum of the selected component of RFs for all the nodes in the selected node set.
2. Using History Outputs to Extract the Abaqus Reaction Force
In this section, we will introduce another method, different from ODB field outputs, for saving the reaction force in Abaqus. Consider a scenario where you want to repeatedly modify a model and extract the Abaqus reaction force (Abaqus RF). Performing this task manually for each new job takes a significant amount of time. To save time, you can set up Abaqus RF to be saved automatically for a group of nodes. Abaqus will then extract the reaction force each time you run the analysis. This can be achieved by utilizing “History Outputs” in Abaqus CAE.
Imagine another scenario where you need to obtain the reaction force in Abaqus. However, you created and analyzed the model months ago. When revisiting the ODB file, you may forget which nodes to extract Abaqus reaction force from. In this situation, you prefer to open the ODB file and review the Abaqus reaction force data saved automatically. This is where Abaqus “History Output” becomes useful.
Now you are familiar with the advantages of defining History Outputs to extract Abaqus RF instead of defining Field Outputs. Let’s explore the implementation of this method.
2.1. Defining History Outputs to Extract the Abaqus Reaction Force
To utilize History Outputs for extracting the Abaqus reaction force, go to the “Step” module in the pre-processing stage. Then, click on “Tools,” select “Set,” and click “Create.”
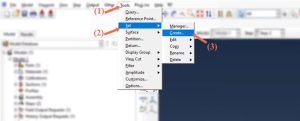
Choose a name for your set and click on “Continue”.
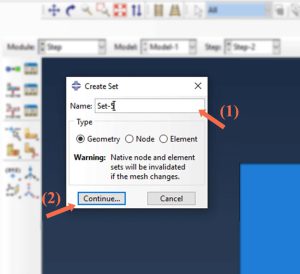
Then choose the region where you need to extract the reaction force in Abaqus. It may be a point, a line, or a surface. For example, we have chosen the left edge of the rectangle here. Then click “Done” to save the selection.

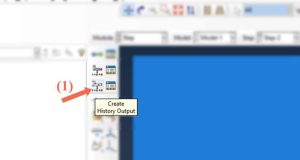
Now, we have defined the set to extract the reaction force in Abaqus. So, the next task is to define the Abaqus RF components that we need. To do so, click on the “Create History Output” icon in the Toolbox area.
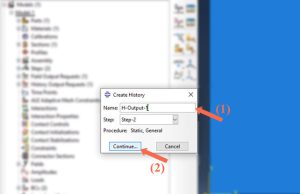
In the displayed window, choose a name for the History Output, or let the default name remain. Then click on “Continue” to proceed.
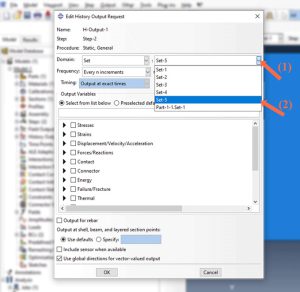
Now, in the “Edit History Output Request” window, choose “Set” for the Domain’s combo box.
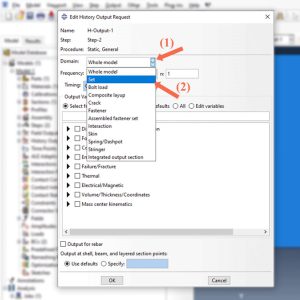
Then choose the set from which you want to extract the reaction force in Abaqus. For example, we have selected “Set-5” here.
Now, it is time to choose the Abaqus RF components that we need to extract. To do so, expand the ‘Forces/Reactions’ group and then check the box for the desired components of reaction force in Abaqus. For example, we have selected Abaqus RF1. It represents the force in the direction of axis x.
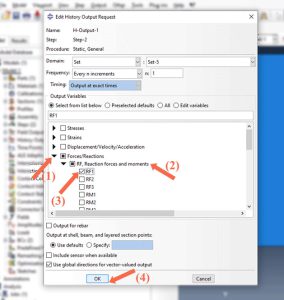
Click “OK” to close the window. That is all you need to set before starting the analysis.
2.2 Access the Abaqus RF Data
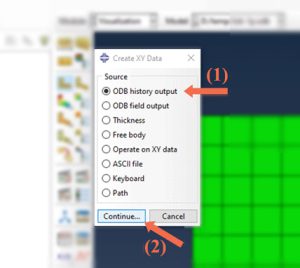
Now, assume that the model has been analyzed, and you want to extract the reaction force in Abaqus. To do so, go to the “Visualization” module, and then click on the “Create XY Data” icon in the toolbox area.

Choose the “ODB History output” and click on “Continue”.
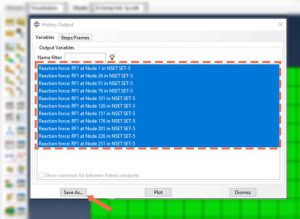
As you can see, all the requested Abaqus reaction force data are saved automatically. So, you don’t need to choose the nodes to extract Abaqus RF in the ‘Visualization’ module. Just select the extracted results and click “Save As”.
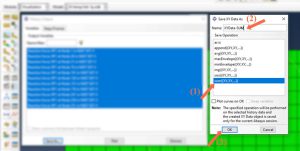
You can save the results in the format you want. For example, we need the total Abaqus RF1, so we have chosen the “Sum” operation. Then we have selected a name for it and clicked on “OK”.
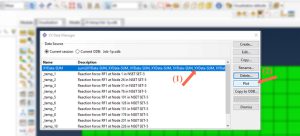
You have saved the desired data. So, you can click the “XY Data Manager” icon in the toolbox area to view or edit the results.

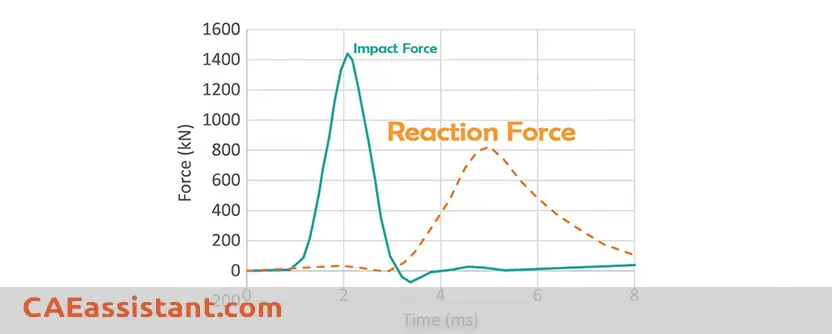
For example, we selected the total Abaqus reaction force and clicked on “Plot”.
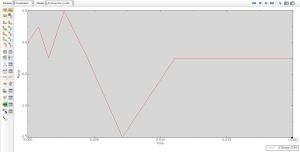
As you can see, we have plotted the diagram for the total Abaqus reaction force over time.
It was another method to extract Abaqus reaction force, different from using Field Outputs. We hope it was helpful for you.
This was all you had to do to find the total reaction force in Abaqus. The CAE Assistant team hopes you have got enough information about Abaqus RF in this post, continue reading other posts available on our blog. Also, It would be useful to see Abaqus Documentation to understand how it would be hard to start a simulation without any Abaqus tutorial.
Learn about how to apply torque and moment in Abaqus by reading this article: What is Abaqus Load Torque (Moment) and How to Apply it in Abaqus?
If you want to start learning ABAQUS for the first time, watching the below demo of the “Abaqus for beginners” tutorial package would be useful and checking the best training resources on the Abaqus course.
Please share your views with the CAE Assistant experts in the comment section. We really appreciate your feedback, as it helps us improve our tutorials and fulfill all your CAE needs without requiring additional tutorials.
Get this article as a PDF file: CAE Assistant – Abaqus RF

| ✅ Subscribed students | +80,000 |
| ✅ Upcoming courses | +300 |
| ✅ Tutorial hours | +300 |
| ✅ Tutorial packages | +100 |
What is reaction forces?
Newton’s third law of motion says that all forces occur in pairs, so if one object exerts a force on another, the second object will respond with an equal and opposite reaction force. The general statement of Newton’s third law of motion is: “For every action, there is an equal and opposite reaction.“
What are the types of contact forces?
There are two types of contact forces as a result of action and reaction forces between objects that have contact together. One of the contact forces is the Normal force. This force is the force that surfaces exert on each other to prevent them from passing through each other. The frictional force is another reaction force that acts parallel to the surface to prevent sliding against each other.
What methods are there to find the Abaqus reaction force?
There are two methods in this regard:
- Defining a reference point and using kinematic coupling: The body can be coupled to a point during the model setup stage. After the analysis, the Reaction force can be checked at this node, which gives you the total reaction force.
- Using XY Data in post-processing to get Abaqus RF: Visualization module> Create XY Data> ODB Field Output> Select “Reaction force” variables> Select desired nodes> Click “Save”> Create XY Data> Operate on XY Data> Select “Sum ((A,A, …))” operator> Select reaction forces you need> Plot Expression
How do you find reaction force by using a reference point?
The body can be coupled to a point during the model setup stage. After the analysis, the Abaqus RF can be checked at this node, which gives you the total reaction force.
How can you find the total reaction force by using reaction forces at all the nodes?
Another method of finding out the Total Reaction Force in Abaqus without going into the model setup stage would be to obtain the reaction forces at all the nodes on the body and then sum up the forces.
Using XY Data in post-processing: Visualization module> Create XY Data> ODB Field Output> Select “Reaction force” variables> Select desired nodes> Click “Save”> Create XY Data> Operate on XY Data> Select “Sum ((A,A, …))” operator> Select reaction forces you need> Plot Expression